Java Related Jars

Thursday, July 30, 2009


struts2.0 jars

This zip folder contains struts2.0 related jar files those are listed below.

commons-logging-1.0.4.jar
freemarker-2.3.8.jar
ognl-2.6.11.jar
struts2-core-2.0.11.1.jar
xwork-2.0.4.jar


download


struts2.1.6 jars

This zip folder contains struts2.1.6 related jar files those are listed below.

commons-logging-1.0.4.jar
freemarker-2.3.13.jar
ognl-2.6.11.jar
struts2-core-2.1.6.jar
xwork-2.1.2.jar
struts2-dojo-plugin-2.1.6.jar
struts2-dwr-plugin-2.1.6.jar
struts2-jasperreports-plugin-2.1.6.jar
....etc


download


Hibernate jars

This zip folder contains Hibernate related jar files those are listed below.

hibernate3.jar
ant-antlr-1.6.3.jar
cglib-2.1.jar
commons-beanutils-1.7.0.jar
commons-collections-2.1.1.jar
commons-lang-2.1.jar
commons-logging-1.0.4.jar
displaytag-1.1.jar
dom4j-1.4.jar
ehcache-1.1.jar
hsqldb.jar
httpbridge.jar
jstl.jar
log4j.jar
xerces-2.6.2.jar


download


jsf jars

This zip folder contains jsf related jar files those are listed below.

commons-beanutils.jar
commons-collections.jar
commons-digester.jar
commons-logging.jar
jsf-api.jar
jsf-impl.jar
jstl.jar
standard.jar


download


Log jars

This zip folder contains log related jar files those are listed below.

log4j-1.2.9.jar


download


Oracle Database jars

This zip folder contains Oracle Database related jar files those are listed below.

commons-dbcp-1.0.jar
ojdbc14.jar


download


MySql jars

This zip folder contains MySql jar files those are listed below.

mysql.jar
mysql-connector-java-5.0.0-beta-bin.jar


download


PDF Generation jars

This zip folder contains PDF Generation jar files those are listed below.

iText-2.1.6.jar
iText-rtf-2.1.6.jar
iText-rups-2.1.6.jar


download


Java Mail jars

This zip folder contains Java Mail jar files, those are listed below.

activation.jar
commons-email-1.0.jar
mail.jar


download


Excel Report Generation jars

This zip folder contains excel report generation jar files, those are listed below.

jxl.jar
poi-2.5.1-final-20040804.jar


download


JPA jars

This zip folder contains JPA jar files, those are listed below.

jpa.jar


download


Bluetooth jars

This zip folder contains Bluetooth jar files, those are listed below.

bluecove-2.0.0.jar
javabluetooth.jar
comm.jar
microemulator-app-swing-2.0.0.jar


download


NTAuthentication jar

This zip folder contains NTAuthentication jar file

NTAuthentication.jar


download


If you know the class name you can get jar file from the following site also


www.findjar.com

JSF Login Example

I had seen many new deveopers looking for jsf login example. So I decided to write a small example.

Below are the required libraries to run this example which are easily availabel
commons-beanutils
commons-collections
commons-digester
commons-el
commons-logging
jsf-api
jsf-impl
jstl
myfaces-all
standard
el-ri
el-api

The structure of the applictaion which I am following is (Eclipse IDE)

JSFLoginExample
|---src
| |----com
| | |----raj
| | | |----SimpleLogin.java
| | | |----LoginBean.java
|---WebContent
| |---WEB-INF
| | |---lib
| | |---faces-config.xml
| | |---web.xml
| |---login.jsp
| |---resultforfail.jsp
| |---resultforSuccess.jsp

It is true that different IDE's use different structure, but at last when war is build they follow same structure.
Lets start...


SimpleLogin.java


package com.raj;

/**
* @author nagarajuv
*
*/

public class SimpleLogin{

private LoginBean loginBean;
public SimpleLogin(){}

public String CheckValidUser(){
if(loginBean.loginname.equals("chandan") && loginBean.password.equals("chand")){
System.out.println("chandan");
return "success";
}
else{
System.out.println("Going to failure page");
return "fail";
}
}

public LoginBean getLoginBean() {
return loginBean;
}

public void setLoginBean(LoginBean loginBean) {
this.loginBean = loginBean;
}

}


LoginBean.java


package com.raj;

/**
* @author nagarajuv
*
*/
public class LoginBean {
String loginname;
String password;

public LoginBean(){
}

/**
* @param loginname
* @param password
*/
public LoginBean(String loginname, String password) {
super();
this.loginname = loginname;
this.password = password;
}

public String getLoginname(){
return loginname;
}

public void setLoginname(String loginname){
this.loginname = loginname;
}

public String getPassword(){
return password;
}

public void setPassword(String password){
this.password = password;
}
}


login.jsp

<%@ page contentType="text/html"%>
<%@ taglib uri="http://java.sun.com/jsf/core" prefix="f"%>
<%@ taglib uri="http://java.sun.com/jsf/html" prefix="h"%>

<f:view>
<html>
<head><title>JSF Simple Login Example</title></head>
<body>
<center>
<h:form>
<table>
<tr>
<td><h:outputText value="Enter Login ID: " /></td>
<td><h:inputText id="loginname" value="#{SimpleLogin.loginBean.loginname}" /></td>
</tr>
<tr>
<td><h:outputText value="Enter Password: " /></td>
<td><h:inputSecret id="password" value="#{SimpleLogin.loginBean.password}" /></td>
</tr>
<tr>
<td> </td>
<td><h:commandButton value="Login" action="#{SimpleLogin.CheckValidUser}" /></td>
</tr>
</table>
</h:form>
</center>
</body>
</html>
</f:view>


resultforsuccess.jsp

Login Success.......!


resultforfail.jsp

Login Fail.......!


faces-config.xml

<?xml version="1.0"?>
<!DOCTYPE faces-config PUBLIC
"-//Sun Microsystems, Inc.//DTD JavaServer Faces Config 1.1//EN"
"http://java.sun.com/dtd/web-facesconfig_1_1.dtd">

<faces-config>
<managed-bean>
<managed-bean-name>loginBean</managed-bean-name>
<managed-bean-class>com.raj.LoginBean</managed-bean-class>
<managed-bean-scope>request</managed-bean-scope>
</managed-bean>
<managed-bean>
<managed-bean-name>SimpleLogin</managed-bean-name>
<managed-bean-class>com.raj.SimpleLogin</managed-bean-class>
<managed-bean-scope>request</managed-bean-scope>
<managed-property>
<property-name>loginBean</property-name>
<value>#{loginBean}</value>
</managed-property>
</managed-bean>

<navigation-rule>
<from-view-id>/login.jsp</from-view-id>
<navigation-case>
<from-action>#{SimpleLogin.CheckValidUser}</from-action>
<from-outcome>success</from-outcome>
<to-view-id>resultforsuccess.jsp</to-view-id>
</navigation-case>
<navigation-case>
<from-action>#{SimpleLogin.CheckValidUser}</from-action>
<from-outcome>fail</from-outcome>
<to-view-id>resultforfail.jsp</to-view-id>
</navigation-case>
</navigation-rule>
</faces-config>


web.xml

<?xml version="1.0"?>
<!DOCTYPE web-app PUBLIC "-//Sun Microsystems, Inc.//DTD Web Application
2.3//EN" "http://java.sun.com/dtd/web-app_2_3.dtd">

<web-app>
<context-param>
<param-name>javax.faces.STATE_SAVING_METHOD</param-name>
<param-value>server</param-value>
</context-param>

<!-- Faces Servlet -->
<servlet>
<servlet-name>Faces Servlet</servlet-name>
<servlet-class>javax.faces.webapp.FacesServlet</servlet-class>
<load-on-startup> 1 </load-on-startup>
</servlet>

<!-- Faces Servlet Mapping -->
<servlet-mapping>
<servlet-name>Faces Servlet</servlet-name>
<url-pattern>*.jsf</url-pattern>
</servlet-mapping>

<welcome-file-list>
<welcome-file>login.jsp</welcome-file>
</welcome-file-list>
</web-app>


Type this url in addressbar--> http://localhost:8080/JSFLoginExample/login.jsf
Enjoy the jsf(most popular java framework today)


Image Hosted by ImageShack.us

Image Hosted by ImageShack.us

CSV Write Using Java

Wednesday, July 29, 2009

CSV, comma separated values, files are commonly used to transport large amounts of tabular data between either companies or applications that are not directly connected. The files are easily editable using common spreadsheet applications like Microsoft Excel.

Fields are separated by commas.
Records are separated with system end of line characters, CRLF (ASCII 13 Dec or 0D Hex and ASCII 10 Dec or 0A Hex respectively) for Windows, LF for Unix, and CR for Mac.

For this application you need one jar file
That is : SuperCSV-1.52.jar


JExcelWriteExample.java


/**
* File Name : CSVWriteExample.java
* Created By : Nagaraju V
* Created Date : Aug 06, 2009
* Purpose : Writing Data to Excel in csv format.
*/
package com.raj.csv;

import java.io.FileWriter;
import java.util.HashMap;
import org.supercsv.io.*;
import org.supercsv.prefs.CsvPreference;
/**
* @author nagarajuv
*
*/
public class CSVWriteExample {

/**
* @param args
*/
public static void main(String[] args) throws Exception{

ICsvMapWriter writer = new CsvMapWriter(new FileWriter("person.csv"), CsvPreference.EXCEL_PREFERENCE);
try {
final String[] header = new String[] { "name", "city", "pin" };
// set up some data to write
final HashMap data1 = new HashMap();
data1.put(header[0], "Raj");
data1.put(header[1], "Vijayawada");
data1.put(header[2], 500026);
final HashMap data2 = new HashMap();
data2.put(header[0], "Suneel");
data2.put(header[1], "Tenali");
data2.put(header[2], 522202);

// the actual writing
writer.writeHeader(header);
writer.write(data1, header);
writer.write(data2, header);

System.out.println("Writing Completed...!");
} finally {
writer.close();
}
}
}

The following source code contains supercsv jar and code. All the best.
Image Hosted by ImageShack.us

JMeter proxy Step-by-step Performance tool

Monday, July 27, 2009


JMeter proxy
Step-by-step


Jmeter is a performance tool you can download the installation file in the following link.


http://jakarta.apache.org/site/downloads/downloads_jmeter.cgi


This short tutorial attempts to explain the exact steps for
JMeter's proxy. For those new to Jmeter, one easy way to create a
test plan is to use the Proxy. What the proxy does is it records
the requests sent to the server. Jmeter's proxy currently does not
support recording HTTPS. Since HTTPS is secure, the proxy is
unable to decrypt the traffic and record the request parameters or
cookies. There are several ways to get around this limitation. The
easiest method is to use Badboy

http://www.badboy.com.au/.
The second option is to record in HTTP and then change the test
plan to use HTTP request defaults.


A Basic Proxy Instructions


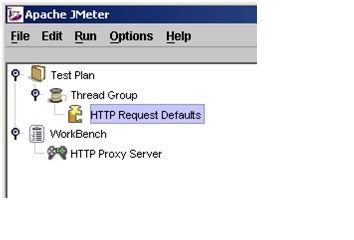
  1. start jmeter with jmeter.bat on windows and jmeter.sh on unix
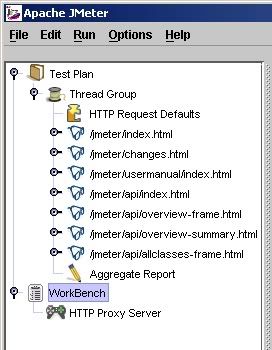
  2. select “test plan” on the tree
  3. right click on the “test plan” and add a new thread group: add -> thread group


  4. select the thread group
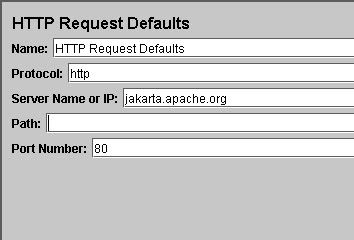
  5. right click “add -> config element -> Http Request Defaults”
  6. Protocol – enter “HTTP”
  7. Server name – enter “jakarta.apache.org”
  8. Path – leave blank
  9. Port number – enter “80”


  10. select workbench
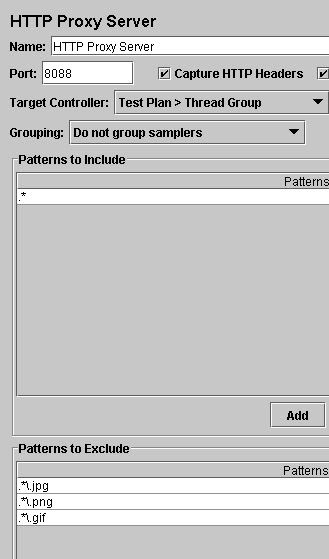
  11. right click on workbench and add the Http proxy: add -> non-test elements -> Http

    Proxy Server
  12. Port field - Enter “9090”
  13. Target Controller – click on the drop down and select “test plan > thread group”
  14. Click the “add” button in “Patterns to include”. This will create a blank entry.
  15. Enter “.*\.html”
  16. Click the “add” button in “Patterns to exclude”. This will create a blank entry.
  17. Enter “.*\.gif”
  18. Click the “start” button at the bottom
  19. Start Internet Explorer, but do not close Jmeter.

    Note: make sure the include and exclude
    patterns are correct. Below are some common patterns for images
    and types of pages.


    .* - all

    .*\.png – png images

    .*\.gif – gif images

    .*\.jpg – jpeg images

    .*\.php

    .*\.jsp

    .*\.html

    .*\.htm

    .*\.js

    As a general tip, it is a good idea to set the homepage
    for your browser to a blank page. This way, it reduces the number
    of unwanted pages Jmeter records during the session. It is a good
    idea to try the proxy with different sites and get comfortable
    with different filtering patterns.


  20. From the tool bar, click “tools -> internet options”. This should bring up the options.
  21. Select the “connection” tab
  22. Click “lan settings” button near the bottom.
  23. On the connections tab, check “Use a proxy server for your LAN”. The address and port

    fields should be enabled now.
  24. Address – enter “Localhost” or the IP address of your system
  25. Port – enter “9090”.
  26. Click “ok” button
  27. Click “ok” button again. This should return you to the browser
  28. In the “Address” bar at the top, enter “http://jakarta.apache.org/jmeter/index.html” and

    hit the “enter” key.
  29. Click on a few links on Jmeter's page.
  30. Close internet explorer and bring up the Jmeter window.

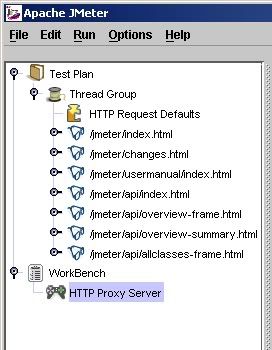
Reviewing the Test Plan


Expand the thread group and there should be several
samplers. At this point, the test plan can be saved as is. If you
forget to add default http request settings, you will have to
manually delete the servername, and port. In this sample, there
aren't any default request parameters. If a particular request
parameter is required by all pages, the request defaults is where
one would add the entries.


  1. Select “thread group”


  2. Right click “add -> listener -> aggregate report” to add an aggregate listener. The
    aggregate listener will show some basic statistics..


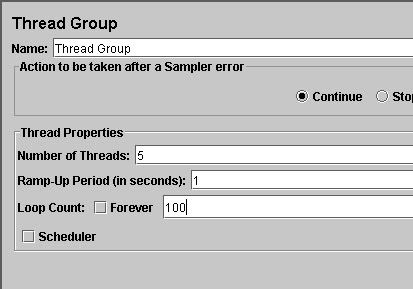
  3. Select “thread group”
  4. Number of threads – enter “5”
  5. Ramp up Period – do not change

  6. Loop count – enter 100


Running the Test


At this point, we are ready to run our test plan and see
what happens. Save the test plan. When you're ready to run the
test, there's two ways:


  1. Run -> Start


  2. CRTL – R


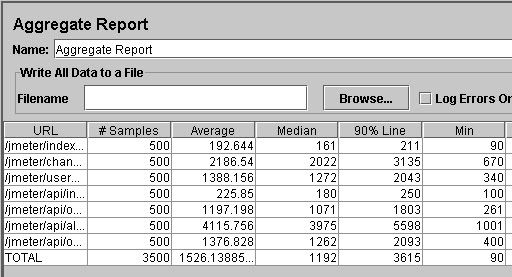
Before you start the test, select “aggregate report”. As the test runs, the statistics will change
until the test is done. At the end of the test, the aggregate report should look like this.


While the test is running, in the upper right-hand corner,
there should be a green square. When the test is done, the box
should be grey.


iText HTML Generation in Java

iText is a freely available Java library from Lowagie.com (see Resources). The iText library is powerful and supports the generation of HTML, RTF, and XML documents, in addition to generating PDFs. You can choose from a variety of fonts to be used in the document. Also, the structure of iText allows you to generate any of the above-mentioned types of documents with the same code.

The iText library contains classes to generate PDF text in various fonts, generate tables in PDF document, add watermarks to pages, and so on. There are many more features available with iText. It would not be possible to demonstrate all of them in a single article. We will cover the basics required for PDF generation.

For this application you need following jars file
Text-2.1.6.jar
iText-rtf-2.1.6.jar
Text-rups-2.1.6.jar

HTMLWritter.java


/**
* File Name : HTMLWritter.java
* Created By : Nagaraju v
* Created Date : Jun 19, 2009
* Purpose :
*/
package com.raj.iTextPDF;

import java.awt.Color;
import java.io.FileOutputStream;
import java.io.IOException;
import com.lowagie.text.*;
import com.lowagie.text.pdf.PdfContentByte;
import com.lowagie.text.html.HtmlWriter;

/**
* @author nagarajuv
*
*/
public class HTMLWritter {

/**
* @param args
*/
public static void main(String[] args) {
System.out.println("--> resulting HTML: HelloWorldHTMLMultiple");
// step 1: creation of a document-object
Document document = new Document();
try {
// step 2: we create a writer
HtmlWriter.getInstance(document,new FileOutputStream("HelloWorldHTMLMultiple.htm"));

// step 3: we open the document
document.open();

// step 4: we add a paragraph to the document
Font font = new Font(Font.COURIER, 10, Font.BOLD);
font.setColor(new Color(0xEE, 0xEE, 0xEE));
Chunk fox = new Chunk("HTML Writer", font);
float superscript = 8.0f;
fox.setTextRise(superscript);
fox.setBackground(new Color(0xa5, 0x2a, 0x2a));
Chunk jumps = new Chunk(" Example ", new Font());
Chunk dog = new Chunk("Nagaraju", new Font(Font.TIMES_ROMAN,
14, Font.ITALIC));
float subscript = -8.0f;
dog.setTextRise(subscript);
dog.setUnderline(new Color(0xFF, 0x00, 0x00), 3.0f, 0.0f, -5.0f
+ subscript, 0.0f, PdfContentByte.LINE_CAP_ROUND);
document.add(fox);
document.add(jumps);
document.add(dog);
document.add(new Paragraph(" Paaaaaaaaaaragraph"));
} catch (DocumentException de) {
System.err.println(de.getMessage());
} catch (IOException ioe) {
System.err.println(ioe.getMessage());
}

// step 5: we close the document
document.close();
}
}

Enjoy with this is nice example
Image Hosted by ImageShack.us

iText PDF Generation in java

iText is a freely available Java library from Lowagie.com (see Resources). The iText library is powerful and supports the generation of HTML, RTF, and XML documents, in addition to generating PDFs. You can choose from a variety of fonts to be used in the document. Also, the structure of iText allows you to generate any of the above-mentioned types of documents with the same code.

The iText library contains classes to generate PDF text in various fonts, generate tables in PDF document, add watermarks to pages, and so on. There are many more features available with iText. It would not be possible to demonstrate all of them in a single article. We will cover the basics required for PDF generation.

For this application you need following jars file
Text-2.1.6.jar
iText-rtf-2.1.6.jar
Text-rups-2.1.6.jar

PDFGeneration.java


/**
* File Name : PDFGeneration.java
* Created By : Nagarajuv
* Created Date : Jun 18, 2009
* Purpose : Generation of PDF Through iText api
*/
package com.raj.iTextPDF;

/**
* @author nagarajuv
*
*/
import java.io.FileOutputStream;
import java.io.IOException;
import com.lowagie.text.*;
import com.lowagie.text.pdf.PdfWriter;

public class PDFGeneration {
/**
* Generates a PDF file with the itext API
*
* @param args
* no arguments needed here
*/
public static void main(String[] args) {

System.out.println("---> resulting PDF: PDFGenerationExample");
// step 1: creation of a document-object
Document document = new Document();
try {
// step 2: we create a writer
PdfWriter.getInstance(document,new FileOutputStream("pdfs/PDFGenerationExample.pdf"));

/** Setting margins to document*/
document.setMarginMirroring(true);
document.open();
// step 4: we add a paragraph to the document
document.add(new Paragraph(
"The left margin of this odd page is 36pt (0.5 inch); the right margin 72pt (1 inch); the top margin 108pt (1.5 inch); the bottom margin 180pt (2.5 inch)."));
Paragraph paragraph = new Paragraph();
paragraph.setAlignment(Element.ALIGN_JUSTIFIED);
for (int i = 0; i < 20; i++) {
paragraph.add("Hello World, Hello Sun, Hello Moon, Hello Stars, Hello Sea, Hello Land, Hello People. ");
}
document.add(paragraph);
document.add(new Paragraph(
"The right margin of this even page is 36pt (0.5 inch); the left margin 72pt (1 inch)."));


} catch (DocumentException de) {
System.err.println(de.getMessage());
} catch (IOException ioe) {
System.err.println(ioe.getMessage());
}

// step 5: we close the document
document.close();
}
}

Enjoy with this is nice example
Image Hosted by ImageShack.us

iText Document Writter

iText is a freely available Java library from Lowagie.com (see Resources). The iText library is powerful and supports the generation of HTML, RTF, and XML documents, in addition to generating PDFs. You can choose from a variety of fonts to be used in the document. Also, the structure of iText allows you to generate any of the above-mentioned types of documents with the same code.

The iText library contains classes to generate PDF text in various fonts, generate tables in PDF document, add watermarks to pages, and so on. There are many more features available with iText. It would not be possible to demonstrate all of them in a single article. We will cover the basics required for PDF generation.

For this application you need following jars file
Text-2.1.6.jar
iText-rtf-2.1.6.jar
Text-rups-2.1.6.jar

DocumentWritter.java


/**
* File Name : DocumentWritter.java
* Created By : Nagaraju V
* Created Date : Jun 18, 2009
* Purpose : Generating Document through iText api
*/
package com.raj.iTextPDF;

import java.awt.Color;
import java.io.FileOutputStream;
import java.io.IOException;
import com.lowagie.text.*;
import com.lowagie.text.pdf.PdfContentByte;
import com.lowagie.text.rtf.RtfWriter2;

/**
* @author nagarajuv
*
*/
public class DocumentWritter {

public static void main(String arg[]){

System.out.println("-> resulting Document: HelloWorldMultiple");
// step 1: creation of a document-object
Document document = new Document();
try {
// step 2: we create a writer
RtfWriter2.getInstance(document,new FileOutputStream("HelloWorldMultiple.rtf"));

// step 3: we open the document
document.open();

// step 4: we add a paragraph to the document
Font font = new Font(Font.COURIER, 10, Font.BOLD);
font.setColor(new Color(0xEE, 0xEE, 0xEE));
Chunk welcome = new Chunk("Welcome to the ", font);

float superscript = 8.0f;
welcome.setTextRise(superscript);
welcome.setBackground(new Color(0xa5, 0x2a, 0x2a));

Chunk doct = new Chunk(" Document ", new Font());

Chunk geneexe = new Chunk(" Generation Example", new Font(Font.TIMES_ROMAN,14, Font.ITALIC));

float subscript = -8.0f;
geneexe.setTextRise(subscript);
geneexe.setUnderline(new Color(0xFF, 0x00, 0x00), 3.0f, 0.0f, -5.0f
+ subscript, 0.0f, PdfContentByte.LINE_CAP_ROUND);
document.add(welcome);
document.add(doct);
document.add(geneexe);
document.add(new Paragraph("----->Value Momentum"));

} catch (DocumentException de) {
System.err.println(de.getMessage());
} catch (IOException ioe) {
System.err.println(ioe.getMessage());
}

// step 5: we close the document
document.close();
}
}

Enjoy with this is nice example
Image Hosted by ImageShack.us

Creating Domain in weblogic server

Thursday, July 23, 2009

Here I am using weblogic 9.2. Although the steps are same, the screens may vary in Weblogic 10x. The
following are steps required to create a new domain in the Weblogic.

By Creating Domain we can isolate our application, servers, workshop from others. This will help us in
assigning multiple servers to multiple project resources with single installation of Weblogic.

We can create Domain in 2 ways.

1. From command prompt.

2. From start menu programs.

From Command Prompt:

1. Go to %BEA_HOME%/weblogic92/common/bin.

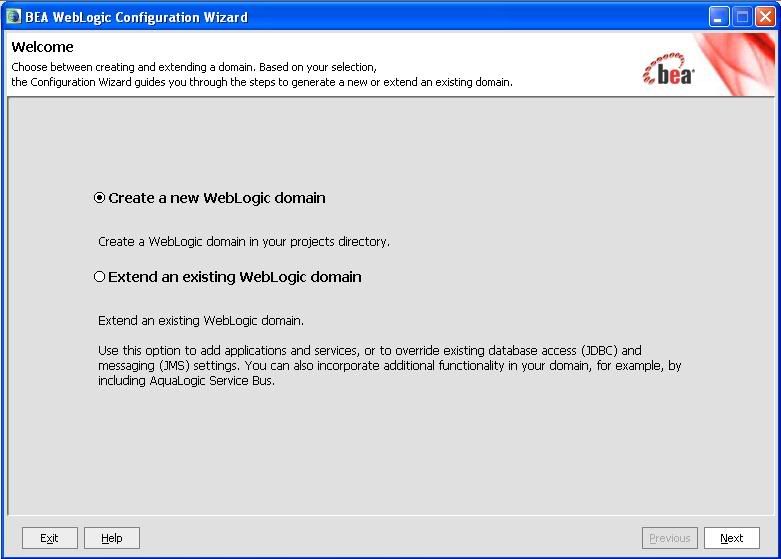
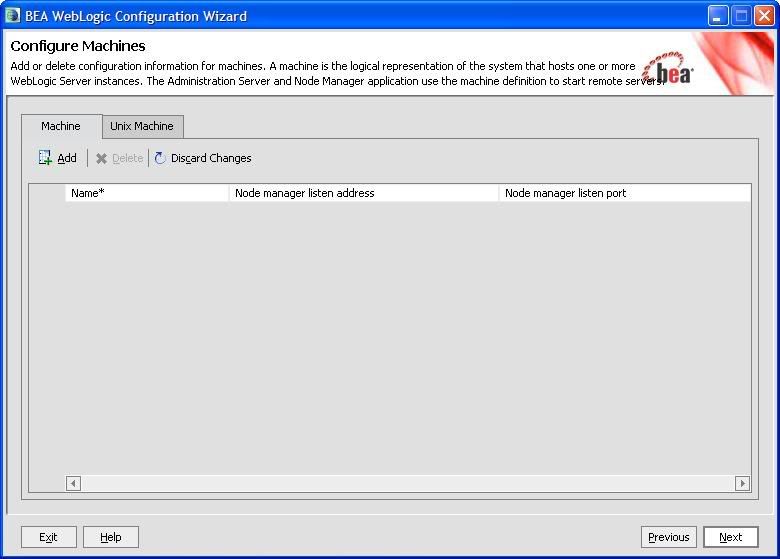
2. Then run config.cmd (config.sh incase of Linux versions) file. This will bring the following screen.


From start menu programs:

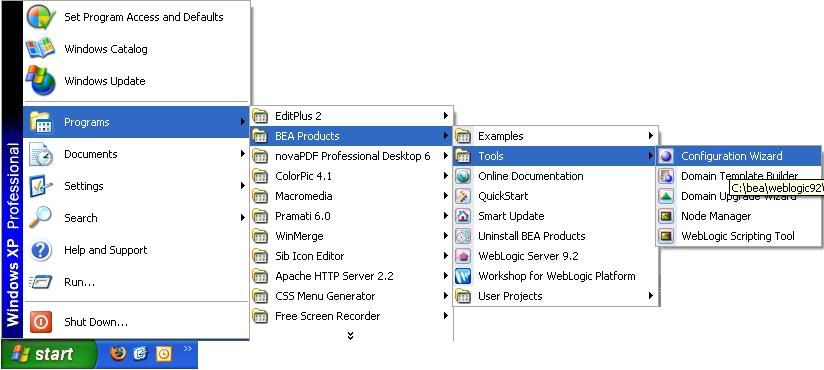
1. From the Programs > BEA Weblogic > Tools > configuration wizard, then you will get above screen.


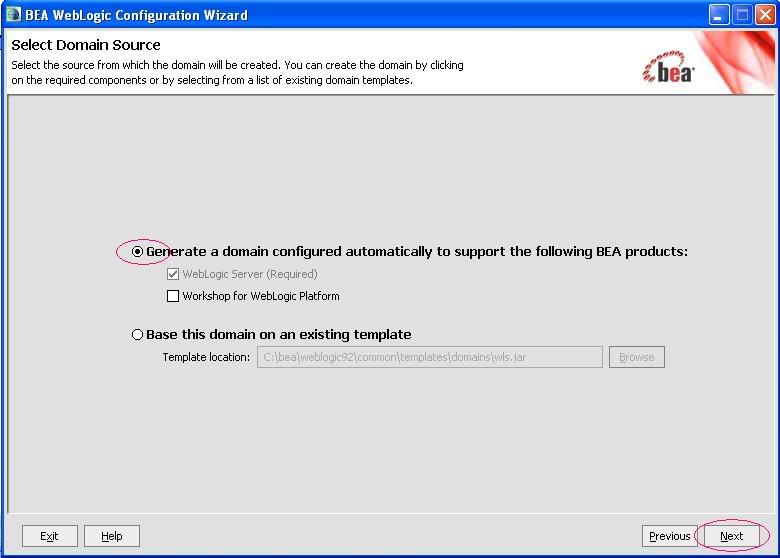
2. Click on Next. Select the option: "Generate a domain configured automatically…"


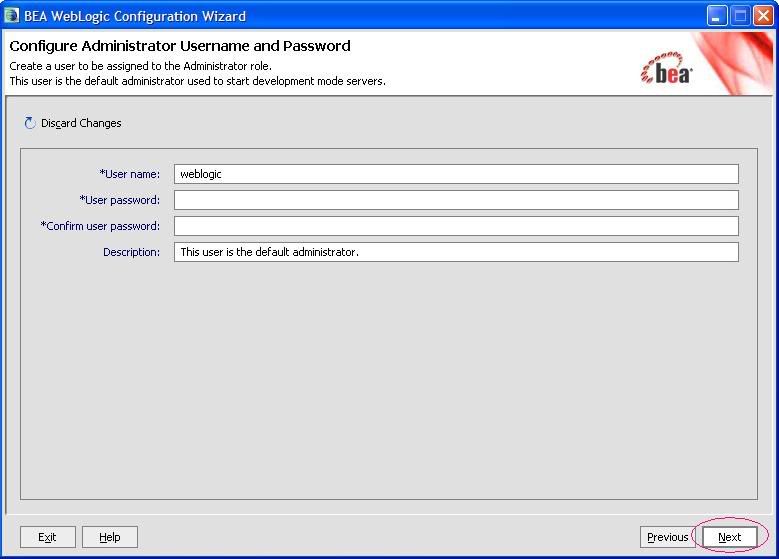
3. Give the Username and password


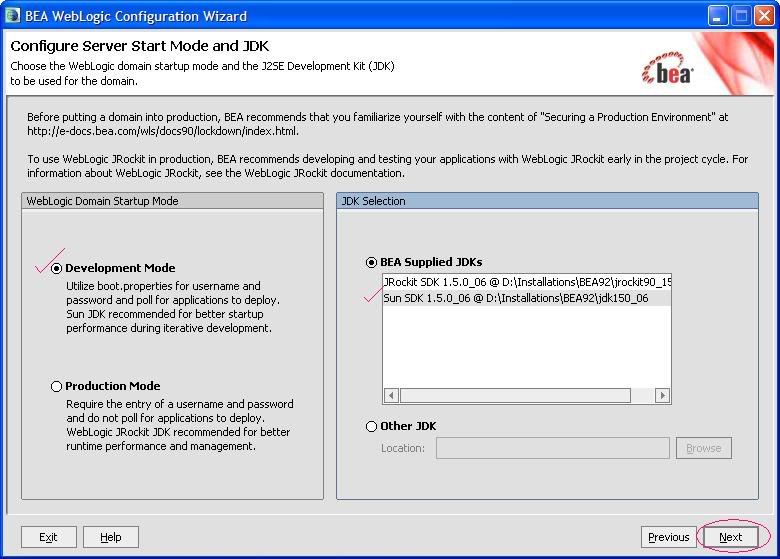
4. Select the Development mode on the left side (We can change to production mode, incase, after creating the
domain) and also select the desired JDK version. Suggest to leaving it to Sun JDK.


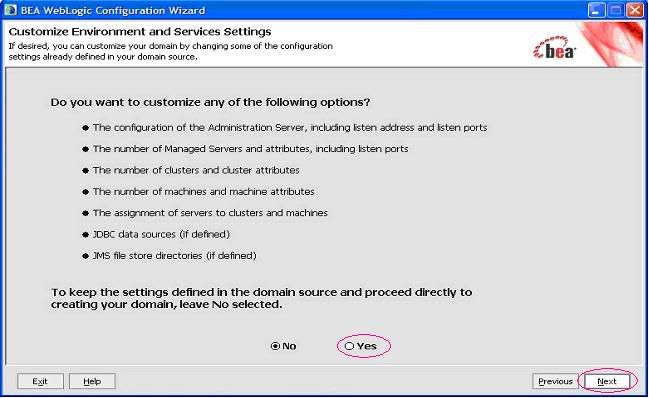
5. To customize the server settings, click on Yes


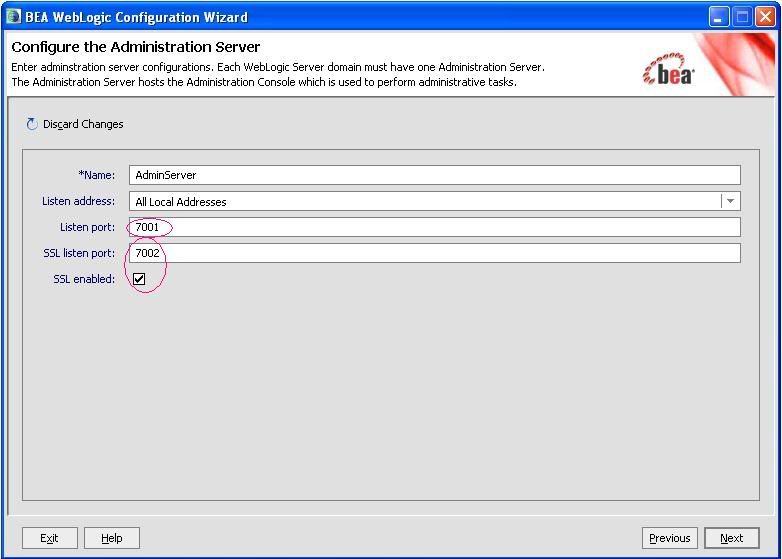
6. Enter the desired port for Weblogic server and choose SSL incase it is needed (these can be changed after the
installation as well)


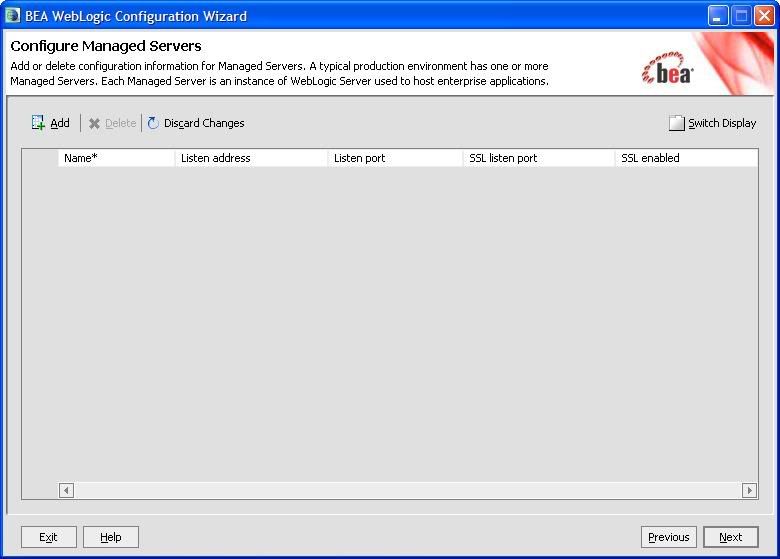
7. Add for any managed servers and any WL instances that needed to configured.


8. Change the domain summary if needed


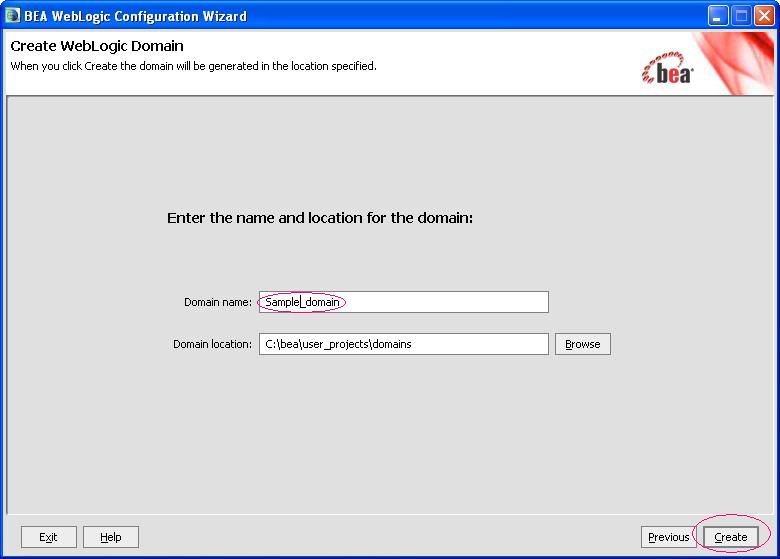
9. Enter the name of the domain. The domain will be created in the directory
%BEA_HOME%\user_projects\domains (by default). Click on Create to create the domain.


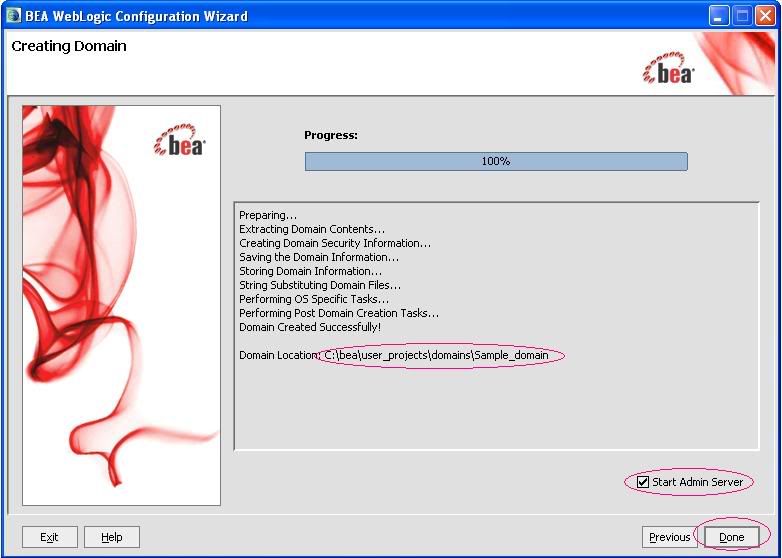
10. Once the domain is created, check the “Start Admin Server” to start the server automatically and click on
“Done” to finish the wizard.


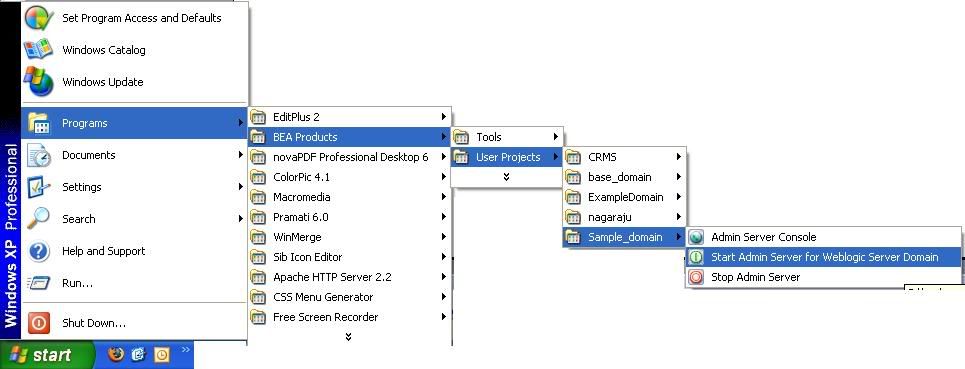
To start the Weblogic domain that we created, use the following navigation

Start > Programs > BEA Products > User Projects > <domain>_name > Start Admin Server for Weblogic
Server Domain to start the server.
Replace <domain> with the domain name that is given in the previous screen.


You can download this concept in pdf Creating Domain in Weblogic.pdf


Tags:Weblogic, Creating Domain StepbyStep process.

Deleting/Removing Domain in weblogic server

In weblogic, we don't have elegant solution to remove the domain.

It would be sufficient to remove the domain directory <<BEA_HOME>>/user_projects/<<Domain Name>>.

But make sure to stop all servers/services in the domain before removing the domain.

Datasource creation in weblogic server

Tuesday, July 21, 2009

Configuring datasource in weblogic server is very easy.
Start the weblogic server and give correct url for weblogic console. For example

http://localhost:7001/console.


Login to the server domain with credentials.
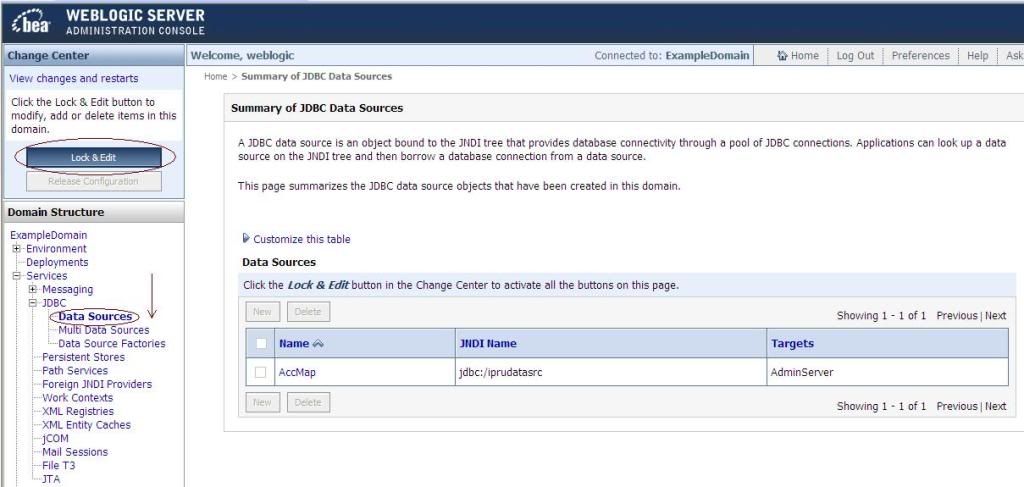
Click Lock & Edit Button and then goto services-->jdbc-->datasources and click on new button.


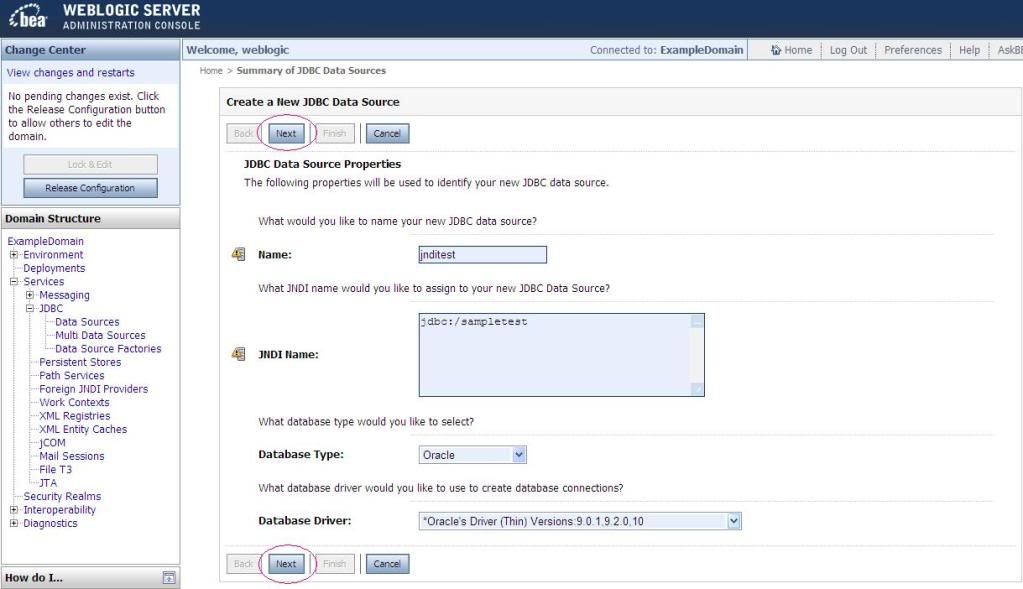
In this form choose name, JNDI Name, Database type and database driver and click next.


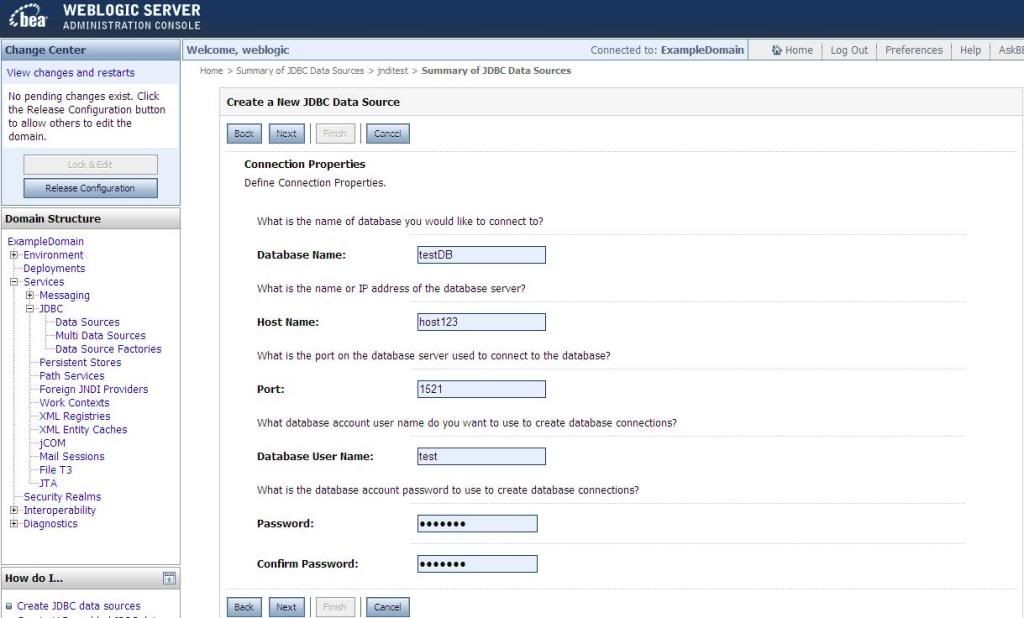
And again click next and give database details such as Database Name, Host Name, Port, Database user Name, Password, Confirm Password. The following fig will explains the concept.


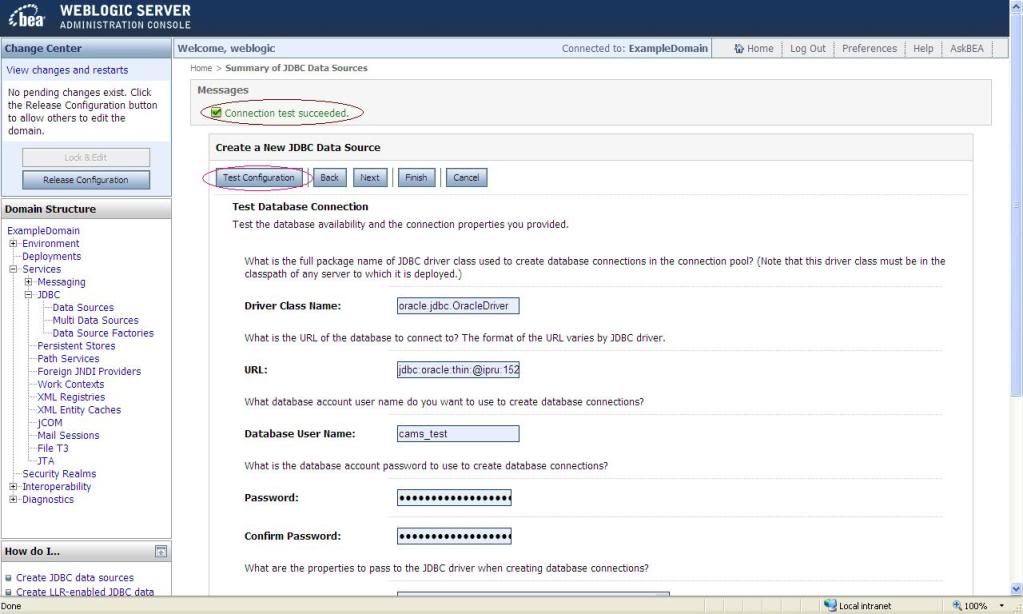
And click next. Now to test connection click on Test Configuration, if the given details are correct it will displays “connection test succeeded”.


And click next button.
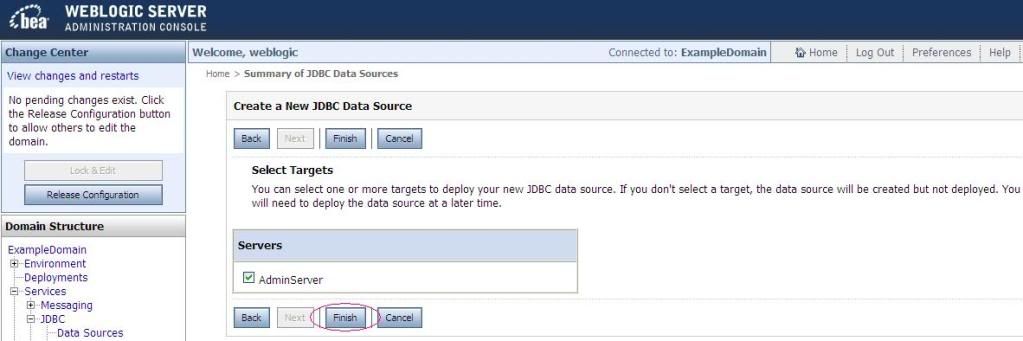
Now check the AdminServer and click finish button.


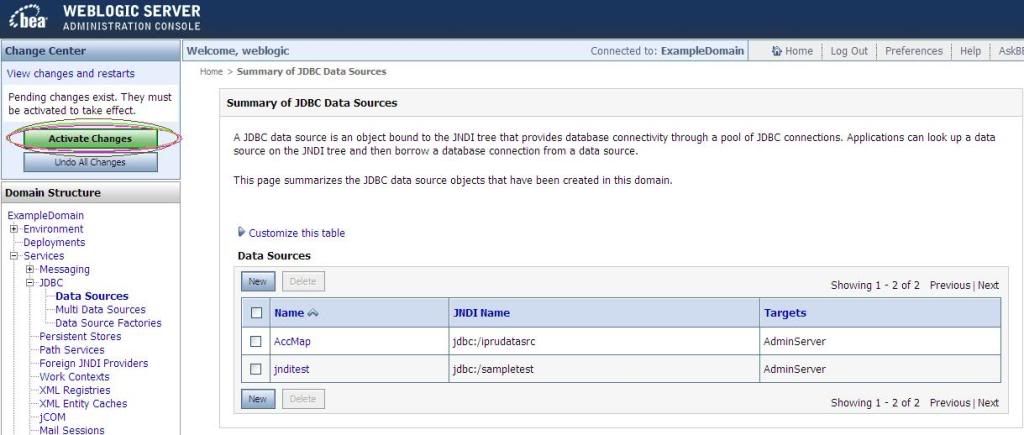
And now click the Activate Changes Button.


And now you can use jndiname "jdbc:/sampletest" in your application.


You can download this concept in pdf Creating Datasource in WeblogicServer.pdf